안녕하세요. 위기의 코딩맨입니다.
오늘은 간단하게 ML PipeLine에 대해서 알아보고
Spark의 공식 문서에서 나오는 pipeline 예제 풀어보도록 하겠습니다.
[We-Co] Spark MLlib PipeLine(파이프라인)
안녕하세요. 위기의코딩맨입니다. 오늘은 MLlib의 파이프라인에 대해 간단하게 알아보도록 하겠습니다. [ PipeLine ] 데이터를 수집하고, 가공, 추출, 적용, 평가, 배포 등 일련의 작업을 반복하며 머
we-co.tistory.com
위에 링크는 예전에 작성했던 PipeLine에 대해서 정리한 것입니다.
참고하셔도 될듯합니다.
[ PipeLine 예제 ]
ML Pipelines - Spark 3.2.1 Documentation
spark.apache.org
문제는 해당 spark의 documentation을 참고하였습니다.
언어는 python으로 작성하였습니다.
먼저, pipeline에서 중요한 Key Point가 있습니다.
pyspark 공식문서를 참고하여 설명해드리도록 하겠습니다.
Pipeline — PySpark 3.2.1 documentation
A simple pipeline, which acts as an estimator. A Pipeline consists of a sequence of stages, each of which is either an Estimator or a Transformer. When Pipeline.fit() is called, the stages are executed in order. If a stage is an Estimator, its Estimator.fi
spark.apache.org
1. Stages - setStages() 함수를 사용하여 pipeline의 단계를 설정하는 부분입니다.
val pipeline = new Pipeline()
  .setStages(Array(tokenizer, hashingTF, lr))
2. fit - 선택적 매개변수를 사용하여 입력 데이터 세트에 모델을 맞추는 작업을 진행합니다.
# Fit the pipeline to training documents.
model = pipeline.fit(training)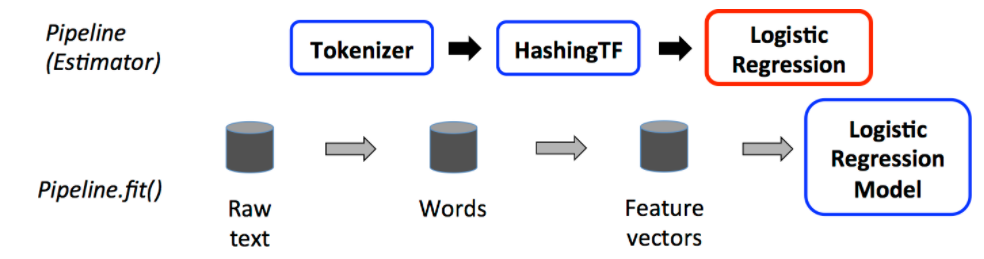
3. transform - model에 데스트 데이터를 입력하여 예측 결과를 나타내는 작업을 진행합니다.
# Prepare test documents, which are unlabeled (id, text) tuples.
test = spark.createDataFrame([
    (4, "spark i j k"),
    (5, "l m n"),
    (6, "spark hadoop spark"),
    (7, "apache hadoop")
], ["id", "text"])

# Make predictions on test documents and print columns of interest.
prediction = model.transform(test)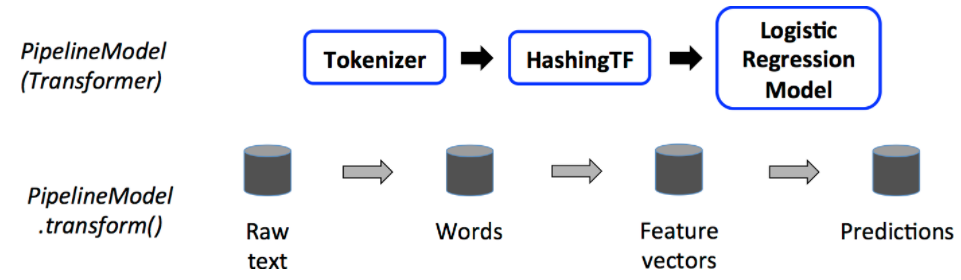
PipeLine은 이렇게 3가지 Key Point가 존재합니다.
이제 전체 소스를 살펴보도록 하겠습니다.
from pyspark.ml import Pipeline
from pyspark.ml.classification import LogisticRegression
from pyspark.ml.feature import HashingTF, Tokenizer
# Prepare training documents from a list of (id, text, label) tuples.
training = spark.createDataFrame([
(0, "a b c d e spark", 1.0),
(1, "b d", 0.0),
(2, "spark f g h", 1.0),
(3, "hadoop mapreduce", 0.0)
], ["id", "text", "label"])
# Configure an ML pipeline, which consists of three stages: tokenizer, hashingTF, and lr.
tokenizer = Tokenizer(inputCol="text", outputCol="words")
hashingTF = HashingTF(inputCol=tokenizer.getOutputCol(), outputCol="features")
lr = LogisticRegression(maxIter=10, regParam=0.001)
pipeline = Pipeline(stages=[tokenizer, hashingTF, lr])
# Fit the pipeline to training documents.
model = pipeline.fit(training)
# Prepare test documents, which are unlabeled (id, text) tuples.
test = spark.createDataFrame([
(4, "spark i j k"),
(5, "l m n"),
(6, "spark hadoop spark"),
(7, "apache hadoop")
], ["id", "text"])
# Make predictions on test documents and print columns of interest.
prediction = model.transform(test)
selected = prediction.select("id", "text", "probability", "prediction")
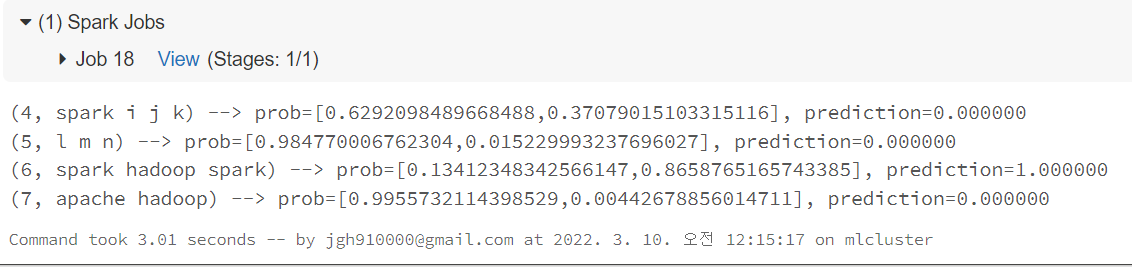
for row in selected.collect():
rid, text, prob, prediction = row # type: ignore
print(
"(%d, %s) --> prob=%s, prediction=%f" % (
rid, text, str(prob), prediction # type: ignore
)
)
우선 필요한 라이브러리를 import를 해서 가져오고
training에 spark DataFrame으로 데이터 셋을 넣어주도록 합니다.
그리고 tokensizer, hashingTF, lr 작업을 pipeline으로 단계를 설정합니다.
생성한 pipeline의 fit함수에 training Data를 넣고 model을 설정하고 결과를 받습니다.
test data를 spark DataFrame으로 생성해주고
prediction에 model의 transform 함수를 사용하여 test data에 적용합니다.
그리고 다음은 결과 출력 코드들입니다.
오늘은 Spark의 pipeline을 이용하여 공식문서에 소개된 간단한 예제를 한번 풀어보았습니다.
pipeline의 기본적인 내용만 알고 있었지만
이렇게 코드로 작성해보니 이해가 잘되는 것 같습니다

'Spark' 카테고리의 다른 글
| [We-Co] Hyperparameter Tuning - Bayesian Oprimization (6) | 2022.03.18 |
|---|---|
| [We-Co] Pyspark Xgboost - Spark, MLlib Pipelines, 수요 예측 (8) | 2022.03.15 |
| [We-Co] Databricks - Spark, 데이터 시각화 (4) | 2022.03.04 |
| [We-Co] Databricks Community Edition - Spark (1) | 2022.02.28 |
| [We-Co] Spark Tokenizer - 문자열나누기 (0) | 2021.09.29 |


