안녕하세요. 위기의 코딩맨입니다.
오늘은 Tensorflow에서 Github로 제공하고 있는 Object Detection API를 사용해보려고 합니다.
기존에 학습시키는데 너무 오래걸리고 환경을 만드는데 너무 오래 걸려서 엄청 힘들었는데...
공부하다 보니 알게된 사실..!
Google에서 Tensorflow github를 통해서 이미 학습된 모델을 제공하고 있었습니다..
물론 다른 디테일 부분을 추가하기 위해서는 별도로 학습을 진행해야 하지만,
이만큼의 발견도 저는 감사합니다!
해당 방식으로 오늘은 Faster-R-CNN예제를 한번 풀어보도록 하겠습니다.
오늘 예제 소스는
GitHub - JGH94/Tensorflow_Detection_Model_ZOO: tensorflow Object detection api model 인식
tensorflow Object detection api model 인식. Contribute to JGH94/Tensorflow_Detection_Model_ZOO development by creating an account on GitHub.
github.com

먼저 github 사이트는
GitHub - tensorflow/models: Models and examples built with TensorFlow
Models and examples built with TensorFlow. Contribute to tensorflow/models development by creating an account on GitHub.
github.com

위 사이트를 들어가면 모델 이름과 속도, 성능을 나타내고 있는 표를 보게되는데 사용하기 편리한 모델을 찾아 사용하시면 될 것 같습니다.
저는 해당 이미지보다 조금 더 스크롤을 내려보면 Faster R-CNN ResNet152 V1 1024x1024 라는 모델로 진행하였습니다.
먼저, 저는 코랩을 통해서 예제를 제작하였습니다.
먼저 tensorflow models을 다운로드 받습니다.
import os
import pathlib

if "models" in pathlib.Path.cwd().parts:
while "models" in pathlib.Path.cwd().parts:
os.chdir('..')
elif not pathlib.Path('models').exists():
!git clone https://github.com/tensorflow/models
%cd models
!git reset --hard d7ce106b8ea449cc629569ca43a95e55a18807fa
%cd ..
다음으로는 Tensorflow Object Detection API를 다운받도록 합니다.
설치 중, Error 발생 시, 다시 설치를 진행하시면 됩니다.
%%bash
cd models/research/
protoc object_detection/protos/*.proto --python_out=.
cp object_detection/packages/tf2/setup.py .
python -m pip install .
설치가 진행되면, object_detection을 가져와서 사용할 수 있게 됩니다.
import matplotlib
import matplotlib.pyplot as plt

import io
import scipy.misc
import numpy as np
from six import BytesIO
from PIL import Image, ImageDraw, ImageFont

import tensorflow as tf

from object_detection.utils import label_map_util
from object_detection.utils import config_util
from object_detection.utils import visualization_utils as viz_utils
from object_detection.builders import model_builder

%matplotlib inline
def load_image_into_numpy_array(path):
    img_data = tf.io.gfile.GFile(path, 'rb').read()
    image = Image.open(BytesIO(img_data))
    (im_width, im_height) = image.size

    return np.array(image.getdata()).reshape(
        (im_height, im_width, 3)).astype(np.uint8)
여기가 중요한 부분인데 작업자가 진행하고 싶은 모델을 설정하는 부분입니다.
model_name = 'faster_rcnn_resnet152_v1_1024x1024_coco17_tpu-8'

해당 모델의 링크 주소를 복사하여 뒷부분인 정보를 model_name으로 설정해주시면 됩니다.
다른 모델을 사용하고 싶으시면 저 부분을 바꿔주시면 됩니다.
!wget http://download.tensorflow.org/models/object_detection/tf2/20200711/faster_rcnn_resnet152_v1_1024x1024_coco17_tpu-8.tar.gz
!tar -xf faster_rcnn_resnet152_v1_1024x1024_coco17_tpu-8.tar.gz
!mv faster_rcnn_resnet152_v1_1024x1024_coco17_tpu-8/checkpoint models/research/object_detection/test_data/
그리고 해당 ms coco dataset에 학습된 Faseter-R-CNN의 Checkpoint 파일을 다운받고 압축을 풀어models/research/object_detection/test_data/ 폴더로 move해 주도록 합니다.
pipeline_config = os.path.join('models/research/object_detection/configs/tf2/', model_name + '.config')
model_dir = 'models/research/object_detection/test_data/checkpoint/'
configs = config_util.get_configs_from_pipeline_file(pipeline_config)
model_config = configs['model']
detection_model = model_builder.build(model_config=model_config, is_training=False)
ckpt = tf.compat.v2.train.Checkpoint(
      model=detection_model)
ckpt.restore(os.path.join(model_dir, 'ckpt-0')).expect_partial()

def get_model_detection_function(model):
  """Get a tf.function for detection."""
  def detect_fn(image):
    """Detect objects in image."""
    image, shapes = model.preprocess(image)
    prediction_dict = model.predict(image, shapes)
    detections = model.postprocess(prediction_dict, shapes)
    return detections, prediction_dict, tf.reshape(shapes, [-1])
  return detect_fn
detect_fn = get_model_detection_function(detection_model)
사용할 모델을 설치한 models에서 가져오고,
위에 링크로 다운받은 체크포인트 파일로 파라미터를 복원하는 작업을 진행합니다.
해당 파일과 사용할 모델을 통해 적용한 Model을 정의하도록 합니다.
LABEL_MAP_PATH = 'models/research/object_detection/data/mscoco_label_map.pbtxt'
label_map_path = LABEL_MAP_PATH
label_map = label_map_util.load_labelmap(label_map_path)
categories = label_map_util.convert_label_map_to_categories(
    label_map,
    max_num_classes=label_map_util.get_max_label_map_index(label_map),
    use_display_name=True)
category_index = label_map_util.create_category_index(categories)
label_map_dict = label_map_util.get_label_map_dict(label_map, use_display_name=True)
ms coo model의 80개의 등록된 Labels을 가져오도록 합니다.
파일을 확인해보면 90개로 등록이 되어있지만 Object Detection에서 사용되는 Labels들은 80개가 사용 가능하다고 합니다.
오늘은 person을 검출하는 예제를 만들어보고 제 사진을 등록하여 인식하는지 한번 보도록 하겠습니다.
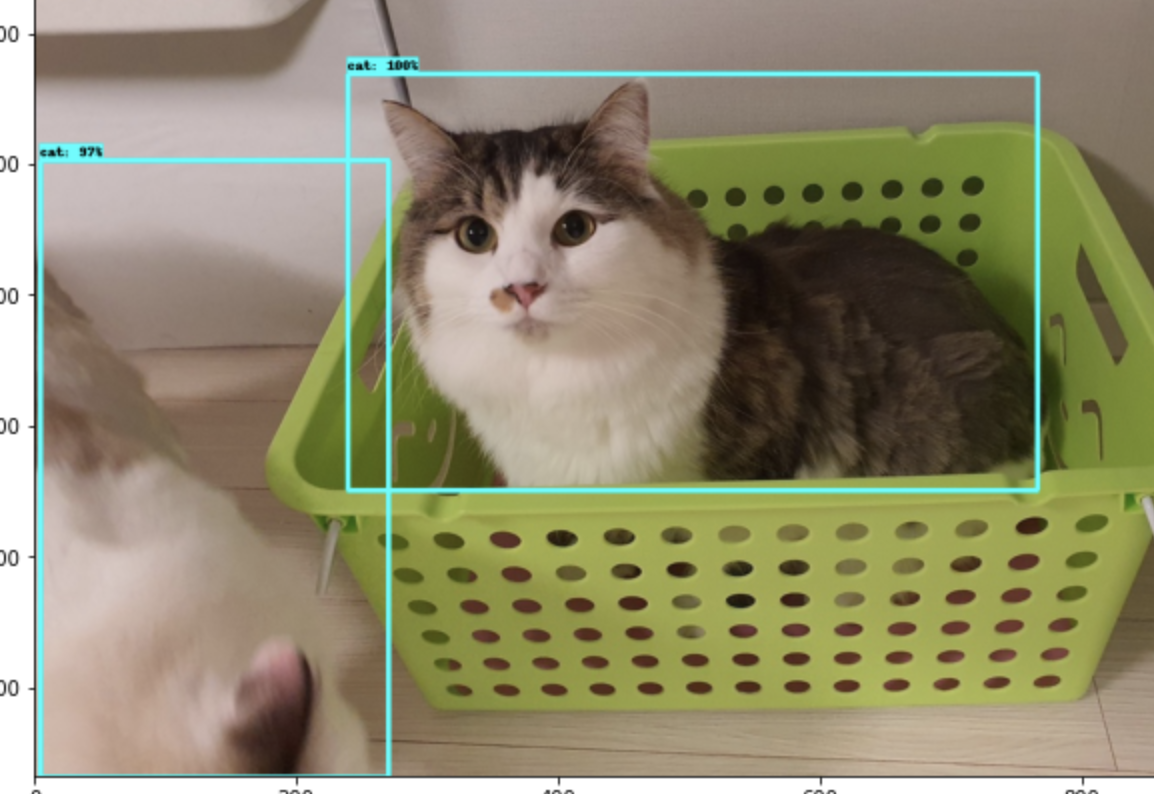
일단 테스트로 고양이 이미지를 넣어 인식해보도록 하겠습니다.
image_ = 'models/research/object_detection/test_images/'
image_path = os.path.join(image_, 'image4.jpg')
image_np = load_image_into_numpy_array(image_path)

input_tensor = tf.convert_to_tensor(np.expand_dims(image_np, 0), dtype=tf.float32)
detections, predictions_dict, shapes = detect_fn(input_tensor)

label_id_offset = 1
image_np_with_detections = image_np.copy()

viz_utils.visualize_boxes_and_labels_on_image_array(
    image_np_with_detections,
    detections['detection_boxes'][0].numpy(),
    (detections['detection_classes'][0].numpy() + label_id_offset).astype(int),
    detections['detection_scores'][0].numpy(),
    category_index,
    use_normalized_coordinates=True,
    max_boxes_to_draw=200,
    min_score_thresh=.70,
    agnostic_mode=False
)

plt.figure(figsize=(20, 20))
plt.imshow(image_np_with_detections)
plt.show()
경로에 해당하는 이미지를 Numpy Array 형태 변환하고,
해당 작업을 진행하게 되면

결과 이미지를 받게됩니다. 하지만 고양이만 인식하는게 아니고 다른 물체도 같이 인식하게 되는 문제가 있습니다.
이러한 문제를 해결하기 위해서는 인식할 물체를 설정해줘야합니다.
코드를 모두 쓰기엔 블로그가 길어지므로 github를 확인해주시길 바랍니다.
큰 차이를 보여주는 부분만 공개하면
image_ = 'models/research/object_detection/test_images/'
image_path = os.path.join(image_, 'image4.jpg')
image_np = load_image_into_numpy_array(image_path)

# 이미지에 대한 예측을 수행합니다.
input_tensor = tf.convert_to_tensor(np.expand_dims(image_np, 0), dtype=tf.float32)
detections, predictions_dict, shapes = detect_fn(input_tensor)

label_id_offset = 1
image_np_with_detections = image_np.copy()

# image_np_with_detections np.array에 시각화 결과를 반환합니다.
# visualize_boxes_and_labels_on_image_array_only_filtered_classes 함수를 이용해서 'person' class만 검출합니다.
visualize_boxes_and_labels_on_image_array_only_filtered_classes(
    image_np_with_detections,
    detections['detection_boxes'][0].numpy(),
    (detections['detection_classes'][0].numpy() + label_id_offset).astype(int),
    detections['detection_scores'][0].numpy(),
    category_index,
    use_normalized_coordinates=True,
    max_boxes_to_draw=200,
    min_score_thresh=.70,
    agnostic_mode=False,
    detection_name_list=['cat']
)

plt.figure(figsize=(12, 16))
plt.imshow(image_np_with_detections)
plt.show()
detection_name_list 가 추가되었으며, 'cat'만 인식하도록 설정하여 이미지를 분석을 진행했습니다.

짜잔
이제 제 이미지를 넣고 분석해보도록 하겠습니다!!
해당 경로에 이미지를 넣고, detection_name_list 부분을 person으로 변경하고 진행해보았습니다.

person 100%로 인식하는 것을 확인할 수 있습니다!
다행이 저는 사람이 맞았습니다.

오늘은 Tensorflow Object Detection API 통해 고양이, 사람인식 등 80개의 Labels을 인식하는 방법을 알아보았습니다.
'Python > Tensorflow' 카테고리의 다른 글
| [We-Co] word2vec - Tensorflow, 자연어처리 (0) | 2022.02.03 |
|---|---|
| [We-Co] NLP의 사용 분야와 용어 - 자연어 처리 (0) | 2022.01.28 |
| [We-Co] NLP - 자연어 의미, 자연어 처리 (0) | 2021.10.20 |
| [We-Co] Fine-Tuning - TensorFlow (0) | 2021.10.07 |
| [We-Co] CheckpointManager API - TensorFlow (0) | 2021.10.06 |


